Software setup
This page is to help you get your local software environment setup for this course.
The Integrated Development Environment (IDE) we use in COMP2300/6300 is Visual Studio Code (we’ll usually call it VSCode for short). VSCode is a generic text editor, which means that it’s really good at editing text, but doesn’t care too much what that text is/represents. However, VSCode also allows people to write “extensions” to help VSCode write & run code for different programming languages.
If you’re someone who (for whatever reason) wants to avoid Microsoft telemetry, licensing, or branding you can install VSCodium instead. Functionally, it’s the the exact same as VSCode (so, for the rest of this course we’ll call it VSCode).
One such extension is the “COMP2300 2021” extension–which includes the compiler, assembler, and a few other tools for getting code onto your discoboard. You don’t have to master everything straight away, we’ll step you through it in the labs (so make sure you attend all the labs!).
Installation
If you’ve installed any previous versions of the COMP2300 tools from before week 1, semester 1, 2022, you should delete them (this will include extensions with the name “COMP2300 2020”, “COMP2300 IDE”, “PlatformIO”, “Cortex Debug”, or “COMP2300’s Cortex Debug”).
On the CSIT lab machines
Setup on the CSIT lab machines is as easy as copy and pasting the following script into a terminal:
cd ~
echo "Copying toolchain zip..."
cp /courses/comp2300/public/toolchain-linux.zip .
mkdir .comp2300
echo "Unzipping toolchain..."
unzip -q toolchain-linux.zip -d .comp2300
rm toolchain-linux.zip
echo "Installing the extension... This may take a bit..."
codium --install-extension comp2300-anu.comp2300-2021-extension
Now you’re ready to go!
Throughout the semester, we may update the COMP2300 Extension. In general it will update automatically whenever we do this.
On your own machine
To set this all up on a new machine (e.g., your own laptop, desktop, raspberry pi, rack-mounted server, etc) here are the steps. If you’re a remote student, you’ll need to follow these carefully.
MacOS and Linux
These instructions should work from MacOS and most Linux distributions.
-
open VSCode, open the Extensions view
-
search for and install the COMP2300 extension
comp2300-anu.comp2300-2021-extension -
reload the VSCode window (using the command palette).
-
now clone the test repo and open it in a VSCode window
-
connect your board to the computer and now you are ready to go!
Windows
Here’s the instructions starting from a clean Windows 10/11 Pro install:
- download & install VSCode
- install Git for Windows - we installed
Git-2.35.1.2-64-bit.exe.- When running the installer, use the default selections.
- set “Git Bash” as the default terminal in VSCode
- open VSCode and open a terminal (Ctrl+Shift+`)
- from the little plus dropdown menu in the terminal area, click “Select Default Profile”
- choose “Git Bash” from the upper dropdown menu that appears
- test it: close your terminal (“x” button), then open a new terminal. It should have a line that says “MINGW64 ~” at the end. That means it’s worked!
- install Make into Git Bash
- download
make-4.3-without-guile-w32-bin.zipfrom ezwinports - Double click the .zip file, click “Extract all”. In the “Select a destination” menu choose “C:\Program Files\Git\mingw64"
- test it: open a Git Bash terminal in VSCode type
makeand press enter. It should saymake: *** No targets specified and no makefile found. Stop.— this is good, it means Make is installed and accessible in Git Bash!
- download
- open VSCode, then search for and install the COMP2300 extension
comp2300-anu.comp2300-2021-extension- test it: clone the test repo (link), open the cloned folder in VSCode, wait for toolchain to install (this will take a while), click the little bottle on the status bar (the tooltip says “COMP2300: Build”). If it comes up with some text in a terminal like the following then everything is working:
- Download and Install Visual C++ Redistributable (link) (required for emulator)
$ make
"/c/Users/charl/.comp2300/arm-none-eabi/bin/arm-none-eabi-gcc" -nostdlib -nostartfiles -mcpu=cortex-m4 -mthumb -Wall -Werror -g -o src/main.o -c src/main.S
"/c/Users/charl/.comp2300/arm-none-eabi/bin/arm-none-eabi-gcc" -nostdlib -nostartfiles -mcpu=cortex-m4 -mthumb -Wall -Werror -g -o lib/startup.o -c lib/startup.S
"/c/Users/charl/.comp2300/arm-none-eabi/bin/arm-none-eabi-ld" -nostdlib -nostartfiles -T lib/link.ld --print-memory-usage src/main.o lib/startup.o -o program.elf
Memory region         Used Size  Region Size  %age Used
        RAM:          0 GB        96 KB       0.00%
        RAM2:         0 GB        32 KB       0.00%
        FLASH:        456 B        1 MB       0.04%
You might be a bit confused about why you have to install all this weird stuff
on Windows. The answer is that for COMP2300 we are using a typical collection
of command-line tools to help run software on your Microbit. The most popular
command-line development tools evolved from simple programs created for the
Unix operating system (stay tuned for the OS lectures…). MacOS and Linux
operating systems, which evolved from Unix, tend to include some of these
programs by default. Windows evolved independently and has different command
line programs. Fortunately, Unix-like tools are so popular and useful that
there are many ways of installing and using them on Windows. When you
installed Git, a program for keeping track of changes in source code files, it
actually installed a collection of Unix programs as well (MinGW—Minimum GNU
for Windows). Running a Git Bash terminal
gives you access to these programs. We just needed one more program, make
that we had to install into MinGW. We’ll talk a bit more about the toolchains
we use in COMP2300 in lectures.
Manual Toolchain Installation
You can use these instructions if the “toolchain download” within VSCode
doesn’t work for some reason, if you just want to know what is in your
.comp2300 toolchain directory.
In most cases, you should not follow these instructions. Instead run the “COMP2300: Update Toolchain” command from within VSCode which will install the latest toolchain for you.
Installing the toolchain manually involves downloading three packages:
xpack-arm-none-eabi, xpack-openocd and discoserver. You’ll need to unzip
the packages and move their contents into specifically named folders in your
home directory. These packages are available in releases on GitHub.
The packages can be found here:
Download the correct package for your platform (OS) and architecture (usually x64 unless you have an ARM Mac or you know better).
- Create a directory called
.comp2300in your home folder (e.g., Linux:/home/charles/.comp2300, MacOS:/Users/charles/.comp2300, Windows:C:\Users\charles\.comp2300. - Extract the discoserver binary into your comp2300 folder.
- Extract the contents of
xpack-arm-none-eabi-gcc...into.comp2300. It should be a folder with the same name as the.zip/.tar.gzfile. - Rename the
xpack-arm-none-eabi-gcc...folder toarm-none-eabi. - Extract the contents of
xpack-openocd...into.comp2300. - Rename the
xpack-openocd...folder toopenocd.
Your .comp2300 folder should now look something like this (note that
executable files look different in windows compared with Linux/MacOS):
~/.comp2300/
+-- discoserver(.exe)
+-- arm-none-eabi/
|   +-- README.md
|   +-- arm-none-eabi
|   +-- bin
|   +-- distro-info
|   +-- include
|   +-- lib
|   +-- libexec
|   +-- share
+-- openocd/
|   +-- OpenULINK(.exe)
|   +-- README.md
|   +-- bin
|   +-- contrib
|   +-- distro-info
|   +-- libexec
|   +-- scripts
|   +-- share
Using VSCode
VSCode has pretty good documentation, and the lab material will link to specific parts of it where appropriate. However, understanding your tools is really important, so take the time to read through the documentation and get to know the features of VSCode. It’ll make your life easier in the end, even if there’s a learning curve at the start.
Once you’ve got VSCode & the necessary extensions installed (and you’ve got your micro:bit) you’re able to write and run your first program. That’s what lab 1 is all about—so head to that page and give it a try.
You may encounter issues along the way as you try and setup the environment we use for the remainder of the course. This is ok! We have some troubleshooting steps and possible solutions included below. If you find something going wrong that isn’t listed here, please check the forum as well and if it’s not there, ask a new question!
Troubleshooting
Here’s a list of issues you might come across, depending on the specific details of your machine. As always, be careful with copy-pasting random code you found on the internet (even in a university course!), and try to understand the problem first before you try the solutions listed.
If there are new problems which come up often enough on the COMP2300 forum I’ll add them here.
Updating the Toolchain
We recently (25 Feb 2022) released an updated version of the COMP2300 toolchain which solves a few issues and enables compatibility with microbit v2.2 boards.
To update the toolchain:
- open VSCode and allow the COMP2300 Extension to update itself,
- run
Developer: Reload Windowfrom the command palette, - run the
COMP2300: Update Toolchaincommand from within VSCode’s command palette.
You can look at how the toolchain works at it’s GitHub repository (link).
“Unable to open CMSIS-DAP device… No Valid JTAG Interface Configured”
If you see this error:
Error: unable to open CMSIS-DAP device 0xd28:0x204
Error: No Valid JTAG Interface Configured.
It means that the debugger is having trouble connecting to your microbit. The cause and solution might be a number of different things depending on what platform you are using.
The first thing to do is to verify that your microbit is actually connected to your computer. When you plug it in, it should appear as a USB drive in your file system called “MICROBIT”. If it hasn’t appeared, just unplug and plug your microbit back in and see if it shows up.
OS-specific advice is below — only try the advice for your OS.
[MacOS]
Generally on MacOS the unplugging and re-plugging procedure works.
[Windows]
If you see this on Windows, please try updating your toolchain (see above). If you still have issues, ask on Piazza and help us by providing information about your system (version of Windows, etc).
[Linux] Install USB device permission rule
On most Linux distributions you might have read/write permission issues in connecting to your microbit. As a result, you might have trouble debugging or uploading.
Error: unable to open CMSIS-DAP device 0xd28:0x204
Error: No Valid JTAG Interface Configured.
make: *** [Makefile:33: upload] Error 255
This problem can be solved by with the following commands:
Don’t run these commands on Windows or MacOS, this is only for Linux.
#!/bin/sh
re_log=1
is_plugdev=`cat /etc/group | grep plugdev`

if [ $? -eq 0 ]; then
    # plugdev based install
    has_user=`echo $is_plugdev | grep $USER`
    if [ $? -ne 0 ]; then
        # Add user to plugdev
        sudo usermod -aG plugdev $USER
        re_log=0
    fi
    sudo sh -c 'cat > /etc/udev/rules.d/98-cmsisdap.rules' <<EOF_plugdev
# mbed CMSIS-DAP
ATTRS{idVendor}=="0d28", ATTRS{idProduct}=="0204", MODE="664", GROUP="plugdev"
KERNEL=="hidraw*", ATTRS{idVendor}=="0d28", ATTRS{idProduct}=="0204", MODE="664", GROUP="plugdev"
EOF_plugdev
else
    # Non-plugdev based install
    sudo sh -c 'cat > /etc/udev/rules.d/98-cmsisdap.rules' <<EOF
# mbed CMSIS-DAP
ATTRS{idVendor}=="0d28", ATTRS{idProduct}=="0204", MODE="664"
KERNEL=="hidraw*", ATTRS{idVendor}=="0d28", ATTRS{idProduct}=="0204", MODE="664"
EOF
fi

sudo udevadm control --reload-rules
echo "Unplug and replug your device to activate the new rules."

if [ $re_log -eq 0 ]; then
    echo "Please restart your machine in order to apply the updated group rules."
fi
Note: the vendor and product ID for the microbit’s debugger chip can be found by doing:
$ dmesg | grep 0d28
[14845.491357] usb 3-2: New USB device found, idVendor=0d28, idProduct=0204, bcdDevice=10.00
Un-plug & re-plug — “Have you tried turning it off & on again?”
Sometimes the board can get into a bad state causing the uploading to fail Stop any active debug session, and try unplug & re-plug to reset the board.
VSCode developer tools console
Before you look at the specific problems, here’s a tip for getting the most useful error messages out of VSCode when things are going wrong. In command pallete, run the Developer: Toggle Developer Tools command and you’ll see a new pane pop up in VSCode. Switch to the Console tab (top-right of the screenshot) and you’ll see something like this:
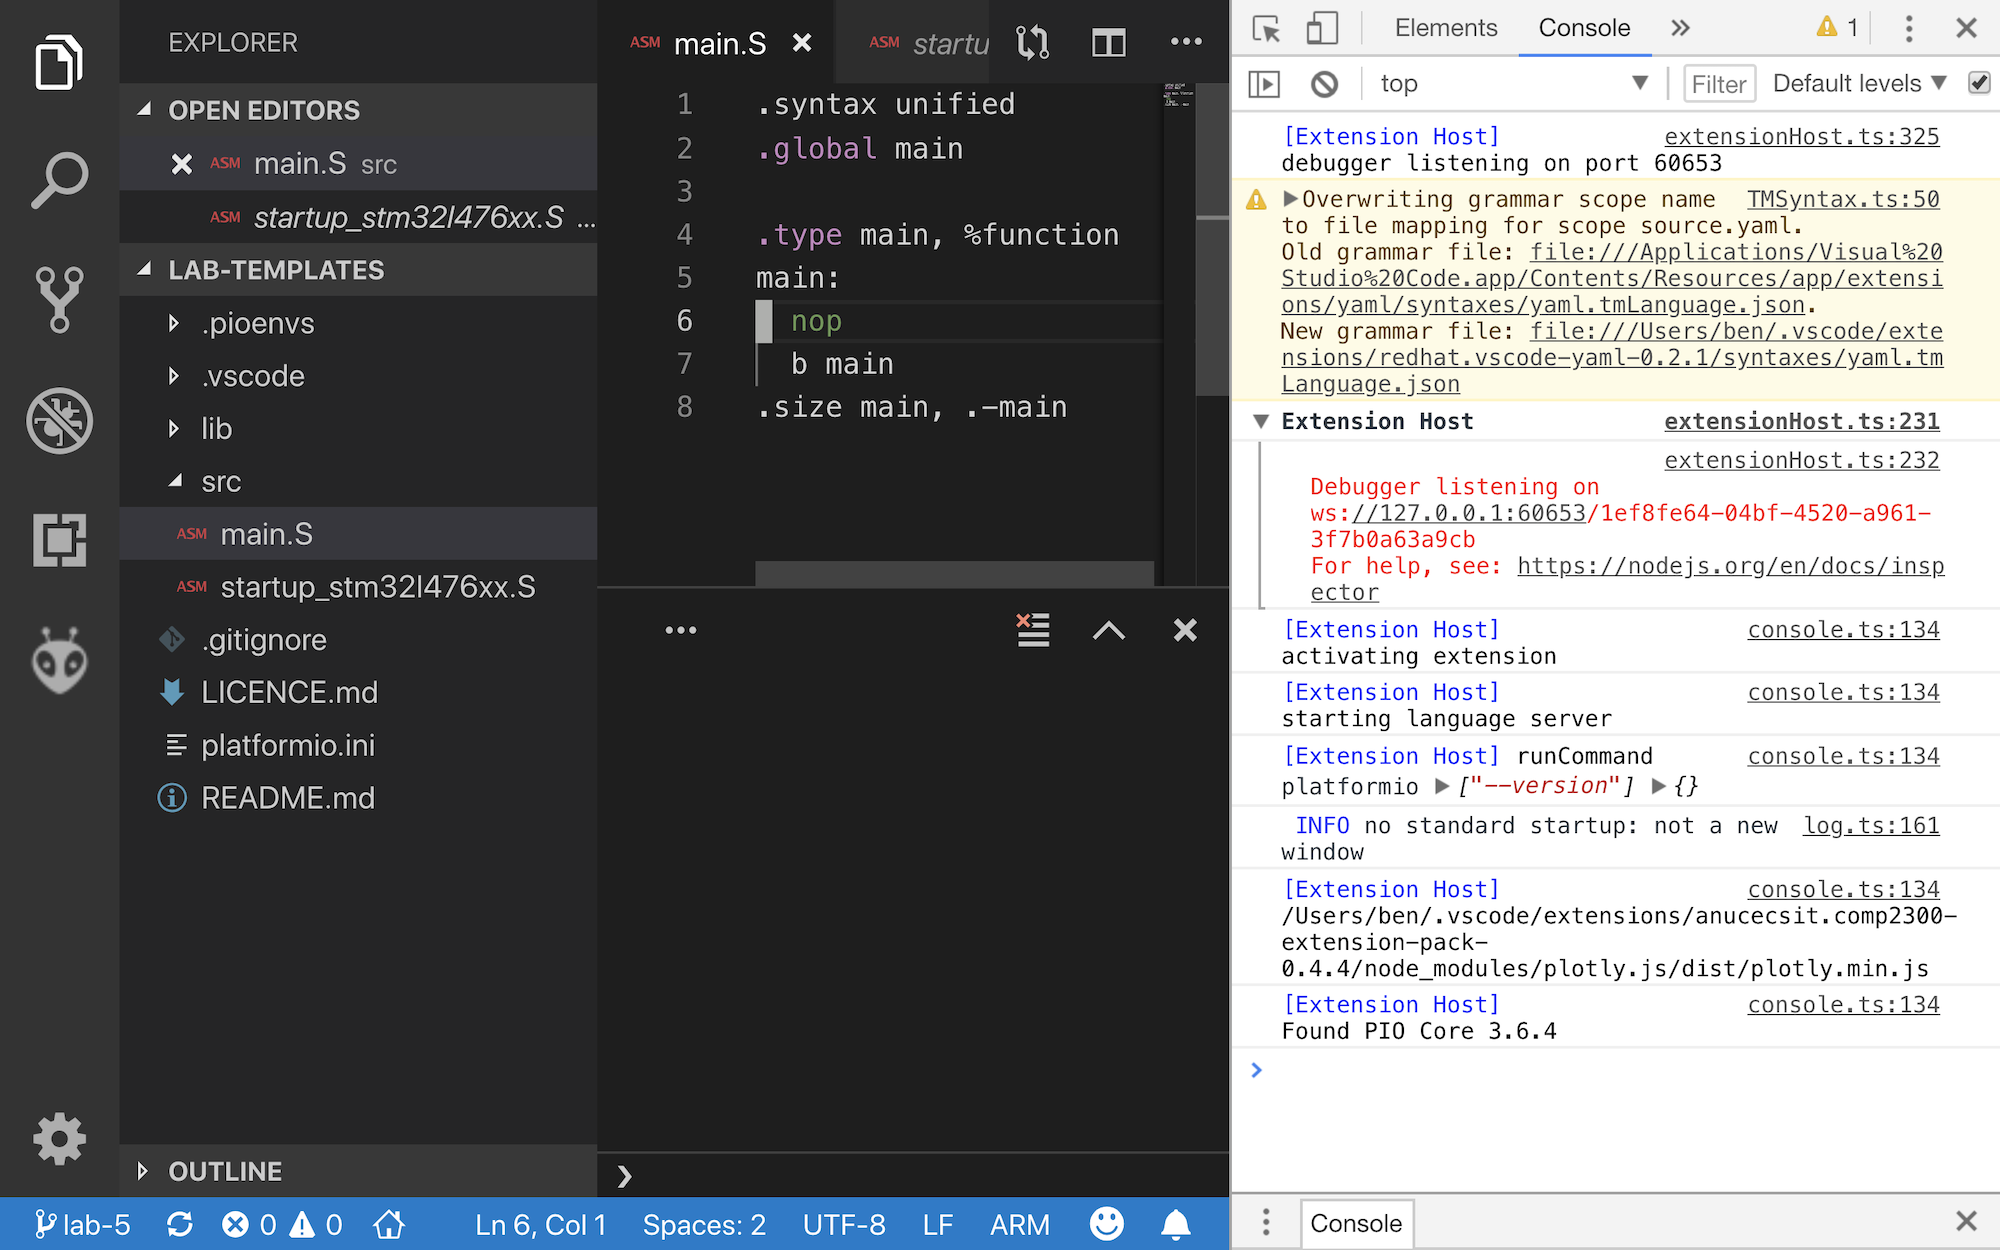
Now, the messages in this Console view aren’t really meant for VSCode users, so there will be a lot of stuff here, and a lot of it probably isn’t relevant. However, if you keep this view open while you do the PlatformIO command which isn’t working for you, then it might output some error messages here (watch for red lines of text) which give you more detailed information about what’s going wrong.
Breakpoint problems
can’t set a breakpoint by clicking in the left-hand “gutter”
If you suddenly lose the ability to set a breakpoint by clicking in the “gutter” to the left of the line numbers next to your code, then check that VSCode is still treating your file as an ARM file rather than just an Assembly file.
To see if this is the case, check the bottom-right hand corner of the VSCode
window (just to the right of the smiley face ☻). If it says “Assembly”, then
click there and switch it to ARM (you should probably use the “Configure file
association for .S” drop-down option to set this to ARM for all .S files
while you’re there).
OpenOCD Upload Problems
connection problems
Error: open failed OR Error: failed to read version
This means that OpenOCD fails to connect the board. First check whether you have connect your board to the computer. Then try unplug and re-plug the board.
If you are on Linux, it could also be a permission issue.
libusb_open()
Error: libusb_open() failed with LIBUSB_ERROR_NOT_SUPPORTED
This doesn’t seem to be a problem as long as there are no other errors that causes the upload program to fail. The cause of this problem is still unknown, but the uploading still seems to succeed in the cases seen so far.